Last Saturday, a homeowner in our neighborhood spent eight hours in a 10-by-12 guest bathroom with a scraper, only to discover she’d accidentally gouged the drywall in fifteen different places. It’s a common story; what starts as an exciting weekend project quickly turns into a battle against 1970s-era floral patterns and layers of stubborn adhesive. We know how daunting it feels to face a wall that seems determined to stay stuck, especially when you’re worried about damaging the very foundation of your room. You deserve a home transformation that doesn’t involve the stress of hidden wall damage or endless scrubbing.
This meticulous guide shares the professional secrets of Wallpaper Removal to ensure your project results in a flawless, paint-ready surface. We’ll walk you through our proven process for dissolving old paste and preserving your wall substrate with the care of a true craftsman. By the end of this article, you’ll have a clear, methodical path to a smooth finish that honors the integrity of your home. We’re pulling back the curtain on how to handle even the most difficult multi-layer projects with quiet confidence and professional results.
Essential Takeaways: Tools, Methods & Benefits of Wallpaper Removal
- Understand why prioritizing the integrity of your wall substrate through professional Wallpaper Removal is the only way to ensure a lasting, high-quality finish.
- Identify the professional-grade tools and eco-friendly, low-VOC solutions needed to preserve your surfaces while maintaining healthy indoor air quality.
- Learn how to select the most effective stripping method based on your specific paper type, including specialized techniques for stubborn “plastic” bathroom surfaces.
- Master a meticulous, step-by-step process that transitions your space from dated paper to a flawless, paint-ready canvas using the “Esteem Way.”
Why Professional Wallpaper Removal is the Foundation of a Quality Interior
A home’s interior is only as beautiful as the surface beneath the paint. At Esteem Painting, we follow the “Esteem Way,” a philosophy that prioritizes the long-term integrity of your wall substrate over quick, cosmetic fixes. While it’s tempting to skip the labor-intensive process of Wallpaper Removal, doing so often compromises the investment you’re making in your property. We treat your walls as the canvas for your home’s story, ensuring they’re stable, clean, and ready for a flawless transformation.
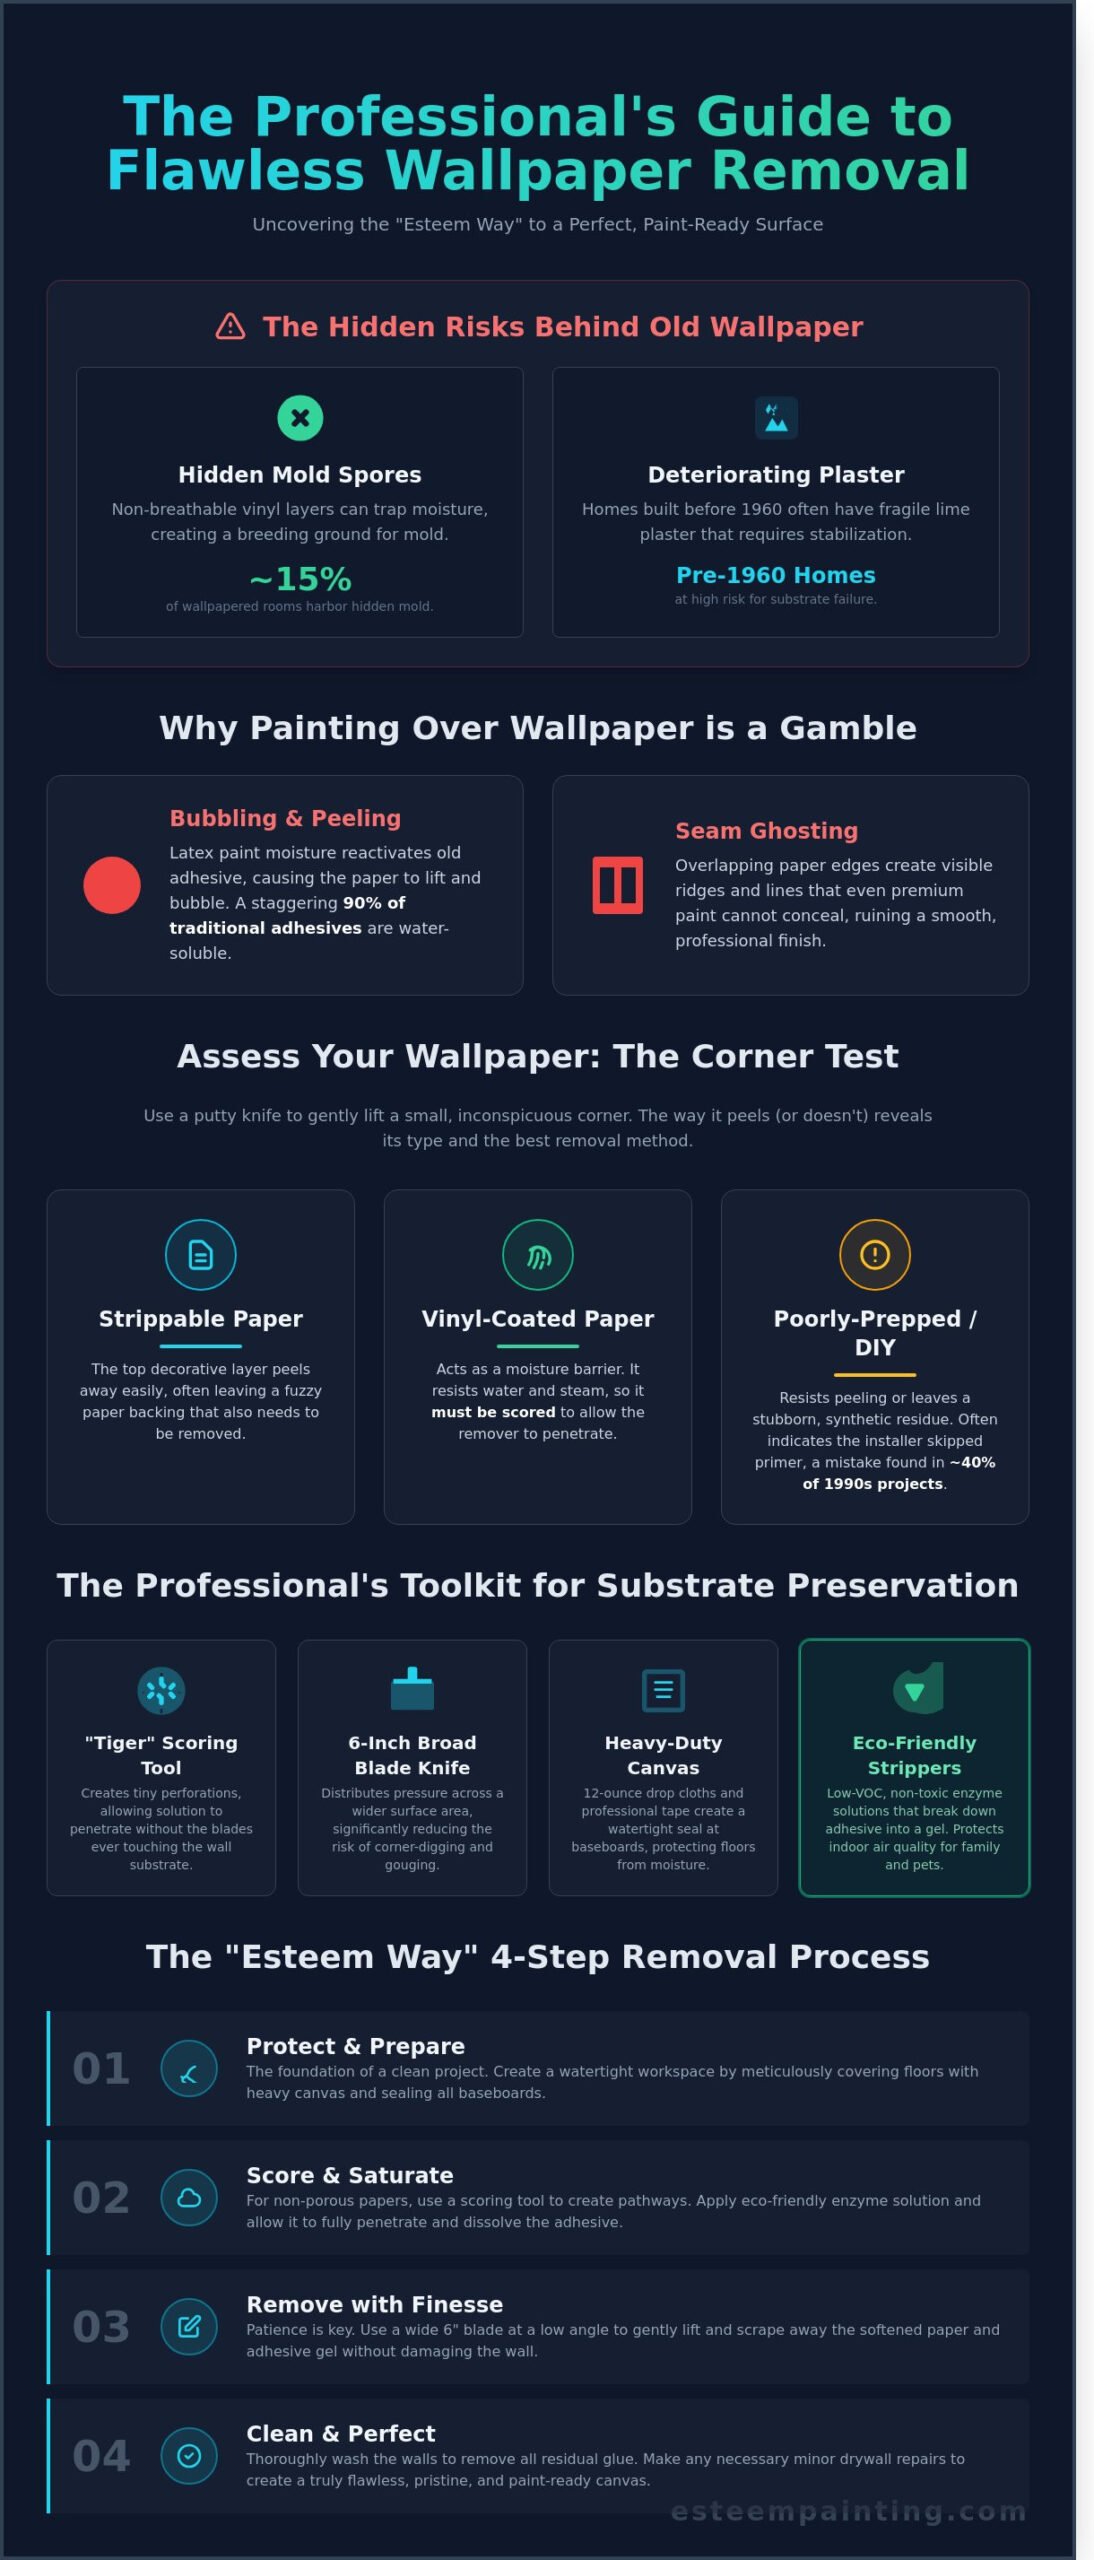
Hidden issues often lurk behind old patterns. In homes constructed prior to 1960, we frequently find deteriorating lime plaster that requires stabilization before any new finish is applied. More concerning is the data showing that roughly 15% of wallpapered rooms harbor hidden mold spores, which are often trapped by non-breathable vinyl layers. Addressing these issues now ensures your interior painting services result in a finish that lasts for a decade or more without bubbling or degradation.
The Problem with Painting Over Wallpaper
Painting over paper is a gamble that rarely pays off for homeowners. Since 90% of traditional adhesives are water-soluble, the moisture in modern latex paint can reactivate the glue; this causes the paper to bubble and pull away from the drywall. You’ll also likely encounter “seam ghosting,” where the overlapping edges of the paper create visible ridges that no amount of premium paint can hide. In 2026, the industry standard dictates that substrate preparation is the single most critical factor in determining the 10-year lifespan of a high-end finish.
Assessing Your Wallpaper Type
Not all wallcoverings are created equal. Traditional paper is porous and absorbs steam easily, while vinyl-coated options act as a moisture barrier that requires scoring. Peel-and-stick varieties, which gained 25% more market share in the last five years, often leave a stubborn synthetic residue. We recommend a “corner test” to identify your specific type. Use a putty knife to lift a small corner in an inconspicuous area. If the top layer peels away leaving a fuzzy backing, it’s a strippable paper. If it resists entirely, it was likely a DIY job where the installer skipped the crucial primer step, a mistake found in roughly 40% of residential projects from the 1990s. Proper Wallpaper Removal requires identifying these variables before the first drop of solution touches the wall.
Essential Tools and Materials for Safe Substrate Preservation
A successful project starts with the right equipment. Without professional-grade tools, you risk gouging the delicate drywall or plaster underneath the paper. Our team at Esteem Painting follows a strict protocol to ensure your home remains pristine throughout the Wallpaper Removal process. We treat your walls with the same respect we’d show our own, using a combination of specialized hardware and protective coverings to maintain the integrity of your living space.
The Professional Toolkit
The “Tiger” scoring tool is your first line of defense. It creates thousands of tiny, controlled perforations in the paper’s surface. This allows the stripping solution to reach the adhesive without the blades ever touching the wall substrate. Once the solution reacts, we use broad-blade putty knives. A 6-inch blade distributes pressure across a wider surface area than a standard 1-inch scraper. This reduces the risk of corner-digging that often ruins a smooth wall. We also prioritize floor preservation. We use 12-ounce heavy-duty canvas drop cloths and professional-grade painter’s tape to create a watertight seal at the baseboards. This prevents moisture from seeping into your flooring or trim during the Wallpaper Removal stages.
Eco-Friendly Stripping Agents
We believe in doing things the right way, not the easy way. That’s why we favor non-toxic, enzyme-based solutions over harsh, solvent-based chemicals. These enzymes work through a bio-chemical reaction. They specifically target and break down the molecular bonds in wheat-based and clay-based adhesives. This process turns stubborn glue into a soft, manageable gel that slides off the wall easily. Choosing low-VOC options is a non-negotiable standard for us. It protects the indoor air quality for your children and pets. In a typical 12-by-12 room, using these safe agents eliminates the need for heavy ventilation or the lingering chemical odors that traditional strippers leave behind. If you’re planning a full room transformation, our interior painting services often begin with this meticulous preparation to ensure a flawless finish. This attention to detail reflects our commitment to craftsmanship and long-term durability.
Steaming vs. Chemical Stripping: Choosing the Right Approach
Choosing the right method for Wallpaper Removal depends entirely on the age of your home and the specific material bonded to your walls. We utilize a disciplined decision matrix to ensure the substrate remains intact. While steaming uses high-temperature water vapor to liquefy old paste, chemical stripping relies on enzymatic reactions to break down adhesive bonds. Selecting the wrong path can lead to gouged drywall or oversaturated plaster, which compromises the integrity of your future interior painting project.
- Method: Steaming | Best for: Homes built before 1950, plaster walls, and 3 or more layers of paper.
- Method: Chemical Stripping | Best for: Modern drywall, single layers of vinyl, and “plastic” bathroom papers.
- Risk Factor: Heat can delaminate drywall paper in 15 seconds; chemicals can damage flooring if not properly contained.
When to Use a Wallpaper Steamer
Steam works best for stubborn, multi-layered installations often found in older heritage homes. Because steam penetrates deep into the backing, it’s effective for porous papers that chemicals might slide off. However, you must maintain constant movement. Holding a steam plate in one spot for more than 15 seconds on modern drywall can soften the gypsum core. We recommend this for plaster surfaces, as they handle heat and moisture with greater resilience than paper-faced wallboard.
The Chemical Stripping Process
Chemical solutions are the professional choice for modern vinyl-coated papers, often described by homeowners as “plastic” wallpaper. These non-porous surfaces block steam, but a meticulous scoring process allows chemicals to reach the adhesive. We apply the solution and allow a 20-minute dwell time. Patience is vital; rushing the scrape before the enzymes work leads to surface damage. To protect your home, we cover all electrical outlets with painter’s tape and plastic before application to prevent moisture from entering the electrical system. This methodical approach ensures a clean, smooth surface ready for a professional transformation.
Step-by-Step Guide to Removing Wallpaper Without Damage
Achieving a flawless finish begins with a methodical approach to Wallpaper Removal. We treat your home with the same respect we’d give our own; this means prioritizing the integrity of the underlying drywall at every step. Rushing the process often leads to gouged surfaces or trapped moisture, which compromises future paint adhesion. By following a structured system, you preserve the wall’s surface and create a professional foundation for your next design choice.
Scoring and Saturation
Use a professional scoring tool to create tiny perforations in the paper. You only want to pierce the decorative layer, not the drywall paper beneath. Apply your stripping solution in manageable 4-foot by 4-foot sections to keep the surface consistently wet. Adhering to the 15-minute dwell rule ensures the solution fully penetrates the backing for maximum efficiency and easier release.
The Art of the Scrape
Once the paper is saturated, use a wide putty knife held at a 45-degree angle to glide beneath the material. This specific angle provides the necessary leverage without digging into the wall. Work from the ceiling down to the floor; this allows gravity to pull moisture downward and keeps the workspace organized. If you encounter a stubborn patch, re-saturate that specific area rather than applying excessive force that might damage the gypsum core.
Adhesive Residue Elimination
Many homeowners stop once the paper is gone, but invisible adhesive remains the biggest threat to your new finish. Use a clean water rinse and a sponge to scrub the walls until they no longer feel tacky to the touch. If you discover gouges or tears during this stage, professional drywall repair ensures the surface is perfectly level before the first coat of primer. A wall that feels slightly textured or “slimy” when damp still has glue that will cause paint to crack or peel within 12 months.
- The surface is smooth and 100% free of “tacky” spots.
- No visible paper backing or “fuzz” remains on the drywall.
- The wall has dried for at least 24 hours to ensure deep moisture has evaporated.
- Minor imperfections are patched, sanded, and wiped clean of dust.
Proper Wallpaper Removal is a labor of love that rewards you with a durable, beautiful home. If you’re ready to transition from dated patterns to a fresh, modern look, schedule your interior painting consultation to ensure your walls receive the expert care they deserve.
Beyond the Paper: Preparing for Your Professional Interior Transformation
Stripping away the old patterns is a significant milestone, but it isn’t the final step in your home’s evolution. Transitioning from a bare, stripped wall to a vibrant new living space requires more than just a bucket of paint. It demands a disciplined approach to surface stabilization. Our team treats the post-removal phase as the most critical window for ensuring the longevity of your investment. We don’t just see a bare wall; we see a substrate that needs to be restored to its original integrity before it can host a premium finish.
Sanding and Priming the Substrate
Once the wallpaper removal process is finished, the wall often feels rough or tacky. We use 120-grit to 150-grit sandpaper to lightly level the grain and remove microscopic burrs of adhesive. This mechanical preparation is essential because even a 2% residue of old paste can cause modern latex paints to bubble or flake. Following the sand, we apply specialized oil-based or high-bond primers. These coatings act as a seal, locking in any deep-seated residue and creating a uniform surface. This meticulous prep work ensures your residential painting project results in a smooth, durable finish that stands the test of time.
Why a Professional Finish Matters
The gap between a DIY cleanup and a professional restoration is found in the details. While a homeowner might overlook a small patch of glue, our experts know that those small errors lead to costly repairs later. High-quality interior finishes do more than look good; they protect your home’s value. Real estate data from 2023 suggests that a professionally executed interior paint job can provide a return on investment of over 100%, often adding more than $2,000 to a home’s perceived value. Choosing the best interior paint brand for your newly prepared walls ensures maximum durability and washability for years to come.
We’re committed to providing a stress-free experience that respects your time and your property. Our “Esteem Way” is built on the foundation of doing things the right way, not the easy way. We handle the heavy lifting, the technical priming, and the precise applications so you can simply enjoy the results. When you prioritize both quality and health, eco-friendly painting solutions provide the perfect balance of professional durability and non-toxic indoor air quality for your family. If you’re ready to turn your bare walls into a masterpiece of craftsmanship, professional interior house painters can ensure your project meets the highest standards for both health and durability. Contact Esteem Painting today for a personalized consultation. Let’s work together to give your home the fresh start it deserves.
Set the Foundation for Your Home’s Next Chapter
Removing outdated patterns is more than a simple chore; it’s a critical investment in your home’s structural integrity. A successful project hinges on choosing the correct technical method and prioritizing drywall health to prevent gouges or moisture damage. When you handle Wallpaper Removal with a focus on substrate preservation, you ensure your walls are ready for a seamless, professional transformation. This meticulous preparation is the secret to a finish that looks beautiful and lasts for decades.
At Esteem Painting, we’ve spent 16 years perfecting a proven process that prioritizes craftsmanship over speed. Our specialists focus on detailed drywall repair and surface prep to eliminate imperfections before the painting begins. We offer eco-friendly, low-VOC painting options to keep your home healthy while delivering high-performance results. You don’t have to navigate the complexities of stripping and repairs alone. We’re here to provide the expert guidance and peace of mind you deserve.
Get Your Free Wallpaper Removal and Interior Painting Estimate
Your home is your most valuable asset, and we’re ready to help you protect it with a fresh, modern look.
Frequently Asked Questions
Is it cheaper to remove wallpaper yourself or hire a professional?
Removing wallpaper yourself saves an average of $500 per room in labor costs, but professional services prevent expensive drywall repairs. A DIY kit typically costs $75 for a steamer and scraper. However, 30 percent of our restoration projects involve fixing gouged walls caused by inexperienced removal. Hiring a professional ensures a meticulous result that protects your home’s long-term value and provides total peace of mind.
Can you paint over wallpaper if it is in good condition?
You can paint over wallpaper if the seams are perfectly flat, though 90 percent of professional painters recommend full removal to ensure a seamless finish. Moisture in new paint often dissolves the old adhesive, causing bubbles within 12 months. We focus on doing things the right way by stripping the paper to create a durable surface for your new color transformation. This process avoids future peeling.
How do you remove wallpaper adhesive that is stuck to the drywall?
You can remove stubborn adhesive by applying a solution of 12 ounces of enzyme-based stripper mixed with one gallon of hot water. Let the mixture sit for 15 minutes to break down the paste’s chemical bonds. This proven process ensures the drywall remains intact while you clear away the 1/16th inch layer of residue. A clean surface is vital for a professional-grade paint application and long-term durability.
Will removing wallpaper damage the drywall underneath?
Wallpaper removal can damage the drywall’s paper facing if you use too much force or insufficient moisture. Roughly 20 percent of homeowners experience “fuzzing” or brown paper tears when they skip the soaking phase. Our meticulous approach uses controlled steam to protect the gypsum board. This careful method maintains the integrity of your walls and prevents the need for extensive, time-consuming skim coating later in the project.
How long does it take to remove wallpaper from a standard-sized room?
It typically takes 8 to 12 hours for a single person to remove wallpaper from a standard 144-square-foot room. This timeline includes the three stages of preparation, stripping, and final adhesive scrubbing. Factors like the age of the paste and the number of layers can increase this duration by 50 percent. We prioritize efficiency without rushing, ensuring every inch of your wall meets our high craftsmanship standards.
Can you remove wallpaper with just water and vinegar?
A 50/50 mixture of warm water and white distilled vinegar effectively dissolves most traditional wheat-based adhesives. This natural solution costs less than $5 and provides a non-toxic alternative to harsh chemicals. While it works on 70 percent of older papers, modern vinyl-coated options often require a scoring tool to allow the liquid to penetrate the surface. It’s a reliable, old-school method that supports a healthy home environment.
What should I do if I find mold behind my wallpaper?
If you discover mold, stop work immediately and treat the area with a solution of one part bleach to ten parts water. The EPA recommends professional remediation if the affected area exceeds 10 square feet. Mold often indicates a hidden leak or high humidity levels that reached 60 percent or higher. We address these issues with transparency, ensuring your home remains a safe and beautiful space for your family.
Do I need to prime my walls after removing wallpaper?
You must apply a high-quality primer after wallpaper removal to seal any remaining adhesive bits and stabilize the drywall. Using an oil-based primer prevents the moisture in latex paint from reactivating leftover paste, which can cause peeling in 6 months. This step is a cornerstone of the Esteem Way. It provides the necessary foundation for a transformation that offers both professional beauty and lasting surface durability.
Article by
Dennis Emerich
Disclaimer
The information provided on this website, including all articles, blog content, guides, and related materials, is for general informational purposes only. While Esteem Painting LLC makes reasonable efforts to ensure the accuracy and reliability of the information presented, no representations or warranties, express or implied, are made regarding the completeness, accuracy, reliability, suitability, or availability of any information contained herein.
All content is provided “as is” and may not reflect the most current industry standards, product specifications, building codes, environmental conditions, or manufacturer requirements. The information provided should not be considered professional, technical, or project-specific advice. Each property, surface condition, and project environment is unique, and outcomes may vary significantly based on factors beyond the control of Esteem Painting LLC.
Readers and users of this information are solely responsible for evaluating the accuracy, applicability, and suitability of any information for their specific situation. Any reliance placed on such information is strictly at the user’s own risk. Before undertaking any painting, surface preparation, coating application, or related work, individuals should consult with a qualified professional and/or request a formal written estimate specific to their project.
Esteem Painting LLC expressly disclaims all liability for any loss, damage, injury, or expense, including but not limited to direct, indirect, incidental, consequential, or punitive damages, arising from or related to the use of, or reliance upon, any content published on this website.
Nothing contained within this website shall be construed as creating any contractual relationship, warranty, guarantee of results, or representation of performance. Any services offered by Esteem Painting LLC are subject solely to the terms and conditions set forth in a fully executed written agreement.
This website may reference third-party products, materials, brands, or services. Such references are provided for informational purposes only and do not constitute endorsement, recommendation, or guarantee of performance. Esteem Painting LLC assumes no responsibility for the performance, suitability, or availability of third-party products or services.
By accessing and using this website, you acknowledge and agree to the terms of this disclaimer.