Investing in high-end paint without the right foundation is like building a custom home on shifting sand. According to Angi data from March 2026, interior painting provides a remarkable 107% return on investment, but that value is only realized if the finish remains flawless. Many homeowners feel anxious about the mess or confused by which repairs are truly necessary. Understanding how to prep walls for painting is the essential first step to ensuring your investment doesn’t peel or bubble within the first year. Since professional surface preparation can cost up to $2.00 per square foot based on January 2026 industry reports, getting the process right is vital for long-term durability.
For a seamless result and a stress-free home transformation, request a free estimate or call 717-204-8511 to discuss your project.
At Esteem Painting, we believe that true quality is found in the details that most people never see. We’ve spent over 16 years perfecting a meticulous preparation process that guarantees a factory-like finish for your interior walls. This guide pulls back the curtain on the professional secrets we use to achieve seamless results, from deep chemical cleaning to precision drywall repair. You’ll learn how our methodical approach creates a durable surface that stands up to daily life while maintaining its high-end aesthetic.
Key Takeaways
- Understand why professional surface preparation is the essential foundation for a high-end interior transformation that prevents peeling and bubbling.
- Master the critical first step of how to prep walls for painting by removing grease and pollutants that often cause amateur projects to fail.
- Learn how to achieve a perfectly seamless substrate through meticulous drywall repair techniques tailored to specific types of wall damage.
- Discover the methodical process of room protection and masking that safeguards your most valuable asset during the transformation.
- Debunk common myths about modern coatings and learn why a dedicated primer is the necessary bridge for long-term durability and color accuracy.
The Professional Philosophy of Surface Preparation
Professional wall preparation isn’t just a preliminary step; it’s the structural foundation of a high-end interior transformation. At Esteem Painting, we operate under a standard we call “Integrity in Craftsmanship.” This philosophy dictates that we do things the right way rather than the easy way. While a “quick refresh” might temporarily mask stains, a meticulous professional finish ensures your investment remains beautiful for years. Learning how to prep walls for painting involves moving beyond aesthetics to address the physical integrity of your surfaces. This approach prevents the common frustrations of peeling, bubbling, and premature wear that plague projects where corners were cut.
Why Preparation Dictates Paint Longevity
Paint relies on two distinct types of bonding to remain stable: mechanical and chemical adhesion. Mechanical adhesion occurs when the liquid coating physically “grips” the microscopic texture of the wall. If a surface is too slick or covered in fine debris, the paint simply sits on top like a loose film. Chemical adhesion is the molecular bond between the coating and the wall surface. Hidden contaminants like skin oils, kitchen grease, or airborne pollutants frequently disrupt this bond. Industry data suggests that even microscopic dust layers can reduce paint adhesion by as much as 50%. Surface profile is the specific measure of a substrate’s roughness that provides the necessary “teeth” for a coating to bond securely. Beyond basic cleaning, understanding the role of primer is essential because it acts as the chemical bridge between the raw wall and the finished topcoat.
Essential Tools for a Professional-Grade Setup
Achieving a premium result for your interior painting project requires specialized equipment that goes far beyond the basic DIY kit. We utilize a specific arsenal designed for precision and cleanliness.
- High-quality carbide scrapers: These tools allow us to remove failing paint and loose material with surgical precision without damaging the underlying drywall.
- Industrial HEPA vacuums: Dust control is a non-negotiable priority. As of January 2026, the EPA has tightened lead dust hazard standards to 5 micrograms per square foot, making professional-grade extraction equipment vital for safety.
- High-output LED raking lights: We use specialized lighting placed at sharp angles to the wall. This technique exposes shadows from dents and imperfections that are invisible under standard residential lighting.
- Eco-friendly cleaning agents: We choose sophisticated, low-VOC deglossers and cleaners that strip away oils without introducing harsh chemical odors into your living space.
The Foundation: Deep Cleaning and Surface Assessment
Amateur painters often view cleaning as a secondary chore, but in the professional world, it’s a non-negotiable requirement for a durable finish. Even in a home that appears tidy, walls accumulate an invisible layer of airborne pollutants, cooking grease, and skin oils. Understanding how to prep walls for painting begins long before the first drop of paint is opened. At Esteem Painting, we utilize a methodical “Esteem Way” of assessment to identify every contaminant that could compromise the bond between the substrate and your new coating. This process ensures that we aren’t just covering up problems but resolving them at the source before transitioning to physical repairs.
The Science of Adhesion: Removing Grime and Dust
Selecting the right cleaning agent is a technical decision based on the room’s specific environment. For standard living areas, a mild detergent solution effectively removes household dust and cobwebs. However, kitchens and high-traffic hallways require heavy-duty degreasers to break down stubborn lipids and waxes. While many online forums suggest a simple wipe-down, we emphasize a critical two-step process. First, we apply the cleaner to emulsify the grime. Second, we perform a dedicated clean-water rinse to remove soapy residues that can act as a release agent. We pay special attention to high-touch areas like light switches and door frames, where concentrated hand oils frequently cause premature paint failure.
Identifying and Treating Hidden Wall Issues
Deep cleaning often reveals underlying conditions that require specialized intervention. We look for signs of water damage, active mildew, or surfactant leaching, which appears as waxy streaks on the surface. For homes built before 1978, we follow strict safety protocols to test for lead-based paint. As of January 12, 2026, the EPA has tightened dust-lead hazard standards to 5 micrograms per square foot, making professional testing more important than ever. If we discover poor adhesion in existing layers or complex moisture issues, we address these through meticulous interior painting services. Once the surface is chemically clean and structurally assessed, we create a perfectly smooth canvas for the repair phase.
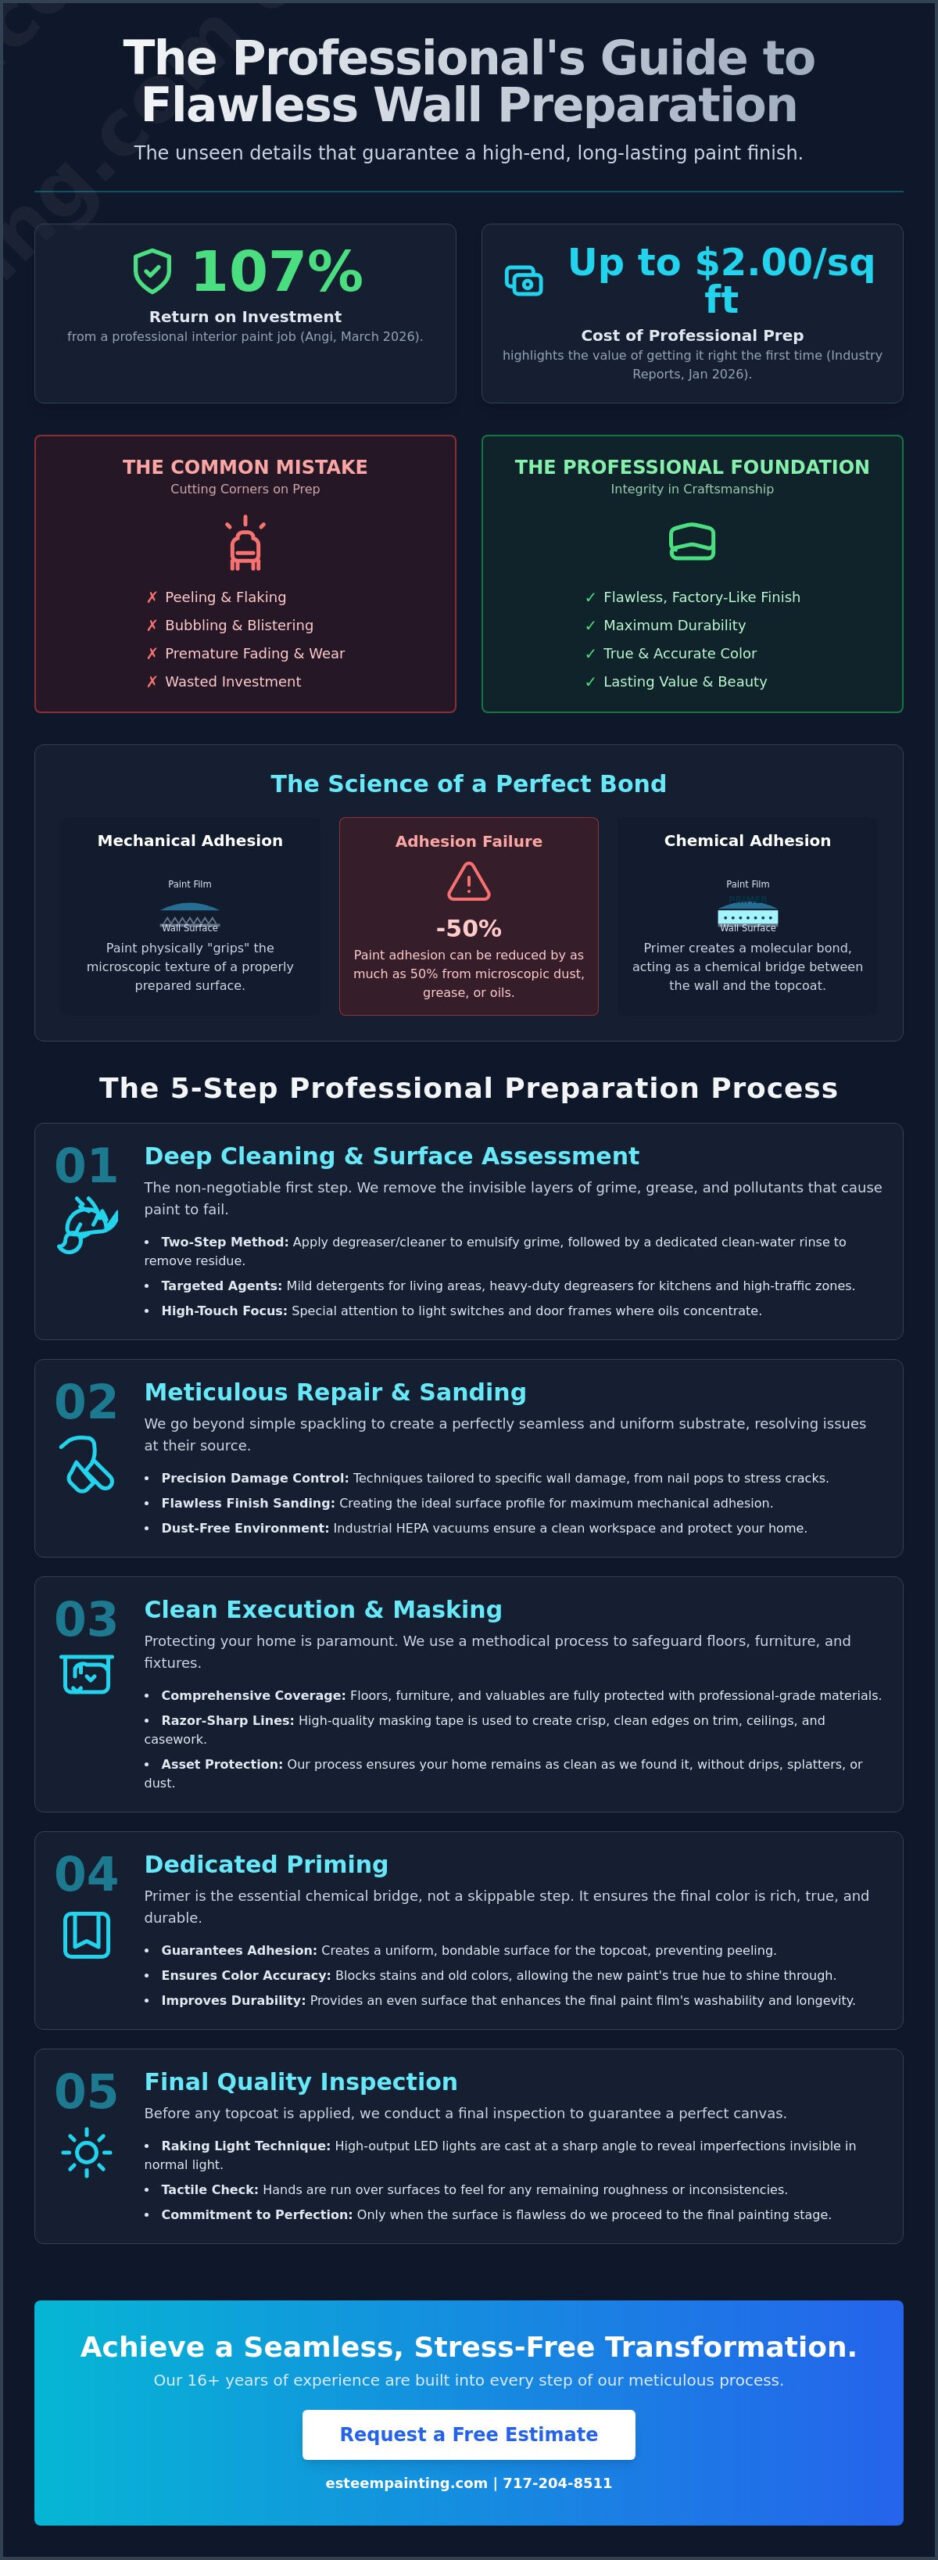
Meticulous Repair: Achieving a Seamless Substrate
After the chemical cleaning is complete, the physical transformation of the substrate begins. Many DIY guides suggest a simple spackle for every hole, but professional results require a more nuanced selection of materials. At Esteem Painting, we treat every dent and crack as a unique challenge to the wall’s integrity. The goal is a surface so smooth that the repair remains invisible even under the harsh LED raking lights mentioned in our earlier section. This level of precision is what separates a standard paint job from a factory-like finish. Understanding how to prep walls for painting at this level ensures that the final coat looks like a solid, unbroken surface rather than a series of patched-over mistakes.
The Art of Professional Drywall Patching
Filling nail holes and hairline cracks is a multi-stage process. For minor indentations, we use high-performance, shrink-resistant compounds. However, structural repairs require a more robust approach. We use fiberglass mesh tape for flat joints to provide immediate reinforcement, while traditional paper tape is often preferred for inner corners to prevent future splitting. Achieving a seamless look in older homes requires significant expertise in drywall repair, as decades of settling often create complex stress fractures. The secret to an invisible patch lies in “feathering.” This involves extending the joint compound 6 to 12 inches beyond the damage, creating a gradual slope that the human eye cannot detect once painted.
Sanding Techniques for a Flawless Finish
Once the patching compound has fully cured, we follow a strict grit progression to reach a “level 5” finish. We typically start with a 120-grit sandpaper to level the bulk of the material and finish with a 220-grit for a polished smoothness. To protect your living environment, we utilize integrated dust containment systems that capture particles at the source. According to March 2026 data from Angi, professional drywall repair can cost between $300 and $900, a price point that reflects the labor-intensive nature of this meticulous sanding process. Beyond the patches themselves, scuff sanding existing glossy paint with a 180-grit sponge is non-negotiable. This creates the mechanical “tooth” required for the new coating to bite into the old surface, preventing the peeling that occurs when paint is applied to a slick substrate.
Clean Execution: Taping and Room Protection
We view room protection as a fundamental sign of respect for your home, which is likely your most valuable asset. A common source of anxiety for homeowners is the mess typically associated with interior renovations. Part of learning how to prep walls for painting the professional way involves mastering the art of containment. Our proven process ensures that while we transform your walls, your floors, furniture, and fixtures remain pristine. This disciplined approach to organization is what allows us to provide a truly stress-free experience from the moment we arrive until the final walkthrough.
Masterful Taping for Sharp Transitions
The razor-sharp lines that define a high-end paint job are the result of meticulous taping. We don’t believe in a one-size-fits-all approach to masking. We select specific tapes based on the substrate, using delicate-surface tape for recently cured finishes and high-adhesion tape for textured trim. A key professional secret is the “sealing” or burnishing technique. After applying the tape, we use a flexible putty knife to press the edges firmly, ensuring no paint can bleed underneath. Unlike many amateur tutorials that suggest leaving tape on until the project is finished, we often remove it while the paint is still slightly tacky. This prevents the dried paint film from tearing, leaving behind the crisp, clean transitions that signify true craftsmanship.
Protecting Your Home: The Professional Setup
Our setup involves multiple layers of defense to safeguard your living space. We begin by moving furniture to the center of the room and covering it with new, lightweight plastic sheeting. For flooring, we use a combination of heavy-duty canvas drop cloths and “rosin paper” or breathable floor protection. This prevents spills from soaking through and protects against impact from tools. When considering how to prep walls for painting, many overlook the importance of sealing off doorways with plastic “zip walls” to prevent any lingering particles from migrating to the rest of your house. This level of detail ensures a seamless cleanup process once the job is finished. Once the environment is secured, we move forward with confidence to the final foundational step: priming.
Priming and the Final Quality Inspection
Many homeowners are led to believe that “paint and primer in one” is a sufficient substitute for a dedicated foundation. While these products serve a purpose for minor touch-ups, they rarely provide the professional results required for a high-end transformation. Understanding how to prep walls for painting correctly means recognizing that primer is not just extra paint; it is a specialized chemical bridge. It seals porous drywall patches and provides a uniform surface profile that prevents the final coat from soaking in unevenly. Without this step, you risk “flashing,” where the finish appears blotchy or dull in certain areas.
Our commitment to Eco-friendly Painting means we prioritize low-VOC and zero-VOC primers. These advanced coatings deliver exceptional adhesion without the lingering chemical odors that once defined home renovation. By choosing the right foundation, we protect both the longevity of your walls and the air quality of your living space. This focus on health and sustainability aligns with the 2026 industry shift toward value-added, high-performance coatings that respect the home environment.
Choosing the Right Primer for Your Project
Not all primers are created equal. Bonding primers are essential for slick, non-porous surfaces, while stain-blocking primers are the only way to permanently seal water damage or smoke residue. If you are curious about specific product performance, refer to our Ultimate Guide to the Best Paint for our professional recommendations. Using a zero-VOC primer is particularly important in bedrooms and nurseries to maintain a healthy home environment. These products have evolved significantly, offering fast-curing times that allow us to move toward the finish coat without unnecessary delays.
The Esteem Quality Check: A Final Verification
The final inspection is the most critical part of learning how to prep walls for painting at a professional level. We use tangential lighting to scan every square inch of the wall for imperfections or missed sanding spots. This “raking light” technique ensures the surface is flawless before the first drop of color is applied. We also verify that all hardware and outlet covers have been safely removed and stored, rather than simply taped over. This transition from meticulous prep to the final application is the moment where the “Esteem Way” truly shines, moving from a disciplined process to a beautiful, lasting result.
If you’re ready to transform your home with a team that values integrity and craftsmanship, we’re here to help. Contact our team today at 717-204-8511 or book your estimate online to start your project the right way.
Follow Esteem Painting for project updates, tips, and transformations. Like, share, and stay connected.
Achieve Your Flawless Home Transformation
Professional wall preparation is the most critical factor in the longevity and beauty of your interior. By prioritizing deep cleaning, meticulous repair, and specialized priming, you ensure a finish that resists peeling and remains seamless under any lighting. Mastering how to prep walls for painting is about more than just aesthetics; it’s an act of integrity that protects your home’s long-term value. Every step we take is designed to provide a durable result that stands the test of time.
With over 16 years of dedicated industry experience, Esteem Painting delivers a stress-free professional process rooted in craftsmanship. We exclusively utilize eco-friendly, low-VOC and zero-VOC paint options to protect your family’s health during the transformation. Your home is your most valuable asset, and it deserves a finish that reflects that value. We’re ready to help you bring your vision to life with precision and care.
Ready for a flawless home transformation? Request a free estimate from Esteem Painting today or call us at 717-204-8511 to experience the “Esteem Way” of professional craftsmanship.
Follow Esteem Painting for project updates, tips, and transformations. Like, share, and stay connected.
Frequently Asked Questions
Do I really need to wash my walls before painting if they look clean?
Yes, because invisible contaminants like hand oils, cooking grease, and airborne pollutants disrupt the chemical bond of your new paint. Even a fine layer of household dust can significantly reduce adhesion. We use a two-step process of cleaning with a mild degreaser followed by a clean-water rinse to ensure the surface is perfectly prepared for a lasting finish.
Can I skip the sanding step if I am using a high-quality primer?
No, because sanding creates the “mechanical tooth” required for the primer to grip the surface securely. While modern primers are advanced, they cannot bond effectively to a slick or glossy substrate. Scuff sanding with a 180-grit or 220-grit sponge is a non-negotiable step that prevents the paint from peeling or flaking in the future.
How long should I wait for wall repairs to dry before starting to paint?
Most minor repairs require between 4 and 24 hours to cure completely depending on the depth of the patch and local humidity levels. Deeper structural repairs using joint compound may take a full day or more to dry through every layer. We always verify that the compound is bone-dry and sanded smooth as part of how to prep walls for painting before we move to the priming phase.
What is the best way to remove old wallpaper residue during prep?
The most effective method involves using warm water mixed with an enzyme-based stripping solution to break down the adhesive. Once the paper is removed, you must scrub the walls thoroughly to eliminate every trace of paste residue. Any leftover glue will cause your new paint to crackle or bubble, so we prioritize a clean, stable surface through our professional wallpaper removal process.
Is it necessary to use a dedicated primer with modern “all-in-one” paints?
Dedicated primers are essential when you are dealing with raw drywall, significant color changes, or stubborn stains. While all-in-one products are convenient for simple refreshes, they lack the specialized resins found in high-performance primers. Using a standalone primer provides a superior chemical bridge that ensures the long-term durability and color accuracy of your interior transformation.
How do I handle walls that have been previously painted with oil-based paint?
Transitioning from oil-based to water-based paint requires thorough deglossing and the application of a high-quality bonding primer. You must sand the entire surface to remove the shine and then use a primer specifically engineered to bridge the gap between different chemical bases. This meticulous approach prevents the topcoat from sliding off or failing to cure properly over the old finish.
What should I do if I find mold or mildew during the cleaning process?
You must treat mold or mildew with a solution of one part bleach to three parts water or a specialized fungicidal cleaner. It is vital to kill the spores at the root and identify the moisture source before applying any new coatings. Simply painting over mold will lead to a failed finish and potential health risks for your household environment.
How can I minimize dust in my home during the wall preparation phase?
We minimize dust by utilizing integrated HEPA extraction vacuums during the sanding phase and sealing doorways with plastic zip walls. This containment strategy is a core part of how to prep walls for painting in a residential setting. These methods ensure that 99% of airborne particles stay within the workspace, protecting your furniture, electronics, and overall air quality.
Article by
Dennis Emerich
Disclaimer
The information provided on this website, including all articles, blog content, guides, and related materials, is for general informational purposes only. While Esteem Painting LLC makes reasonable efforts to ensure the accuracy and reliability of the information presented, no representations or warranties, express or implied, are made regarding the completeness, accuracy, reliability, suitability, or availability of any information contained herein.
All content is provided “as is” and may not reflect the most current industry standards, product specifications, building codes, environmental conditions, or manufacturer requirements. The information provided should not be considered professional, technical, or project-specific advice. Each property, surface condition, and project environment is unique, and outcomes may vary significantly based on factors beyond the control of Esteem Painting LLC.
Readers and users of this information are solely responsible for evaluating the accuracy, applicability, and suitability of any information for their specific situation. Any reliance placed on such information is strictly at the user’s own risk. Before undertaking any painting, surface preparation, coating application, or related work, individuals should consult with a qualified professional and/or request a formal written estimate specific to their project.
Esteem Painting LLC expressly disclaims all liability for any loss, damage, injury, or expense, including but not limited to direct, indirect, incidental, consequential, or punitive damages, arising from or related to the use of, or reliance upon, any content published on this website.
Nothing contained within this website shall be construed as creating any contractual relationship, warranty, guarantee of results, or representation of performance. Any services offered by Esteem Painting LLC are subject solely to the terms and conditions set forth in a fully executed written agreement.
This website may reference third-party products, materials, brands, or services. Such references are provided for informational purposes only and do not constitute endorsement, recommendation, or guarantee of performance. Esteem Painting LLC assumes no responsibility for the performance, suitability, or availability of third-party products or services.
By accessing and using this website, you acknowledge and agree to the terms of this disclaimer.